Please note: If you wish to reproduce this in any way please credit me. We all work very hard and share our knowledge freely in the SCA. It would be a shame to find my work in someone elses name. Thank you.
This class was given in New Zealand (The Cresent Isles, Kingdom of Lochac) at the S.C.A. event ‘Canterbury Faire’ in 2012.
How it worked:
It was nerve wracking and I had no idea how it would go. This was the first time I had tried to teach/help people to pattern their own doublet’s en-masse, but I wanted to help people and stretch my own learning and teaching.
The instructions were for the participants to bring their own 2.5-3 metres of cotton/calico/bed sheet, pins and pen.
I had made different ‘sizes’ of my doublet pattern based off the doublets I had patterned for each person I had made/fitted in the last few years. Every time I make a pattern for someone, I keep the trial or make one from the original. The people I have patterned over the years were all different sizes, and as every doublet needs to be fitted to the person, it wasn’t going to matter if the sizing at the workshop was a little off – only that it was the closest fit at the time.
I made a size 10, 12, 14, 16, and made 3 of each of those in preparation. anything bigger or smaller i would use my eye to make on the day. I also bought vivids, pens, pins and some extra material with me, just in-case.
I asked two of my friends if they could bring their sewing machines to the event. I was coming from the other Island in New Zealand and had limited space/weight. To get a good fit sewing the seams with the machine is essential for a short time frame – hand sewing the seams to test for fit would take too long for the class and pins only do so much.
The idea was that the participant would trace around the full pattern that best suited their size, changing the waist length at that time. To then sew up the full pattern, pin it to fit, mark where the pins are, re-sew and cut the pattern to size.
There were 8 participants. All made doublets patterns and all were fitted during that time. It was hard work and we used longer than the 2 hours allotted for those that wished to stay who hadn’t finsihed, but it was worth it.
THE CLASS:

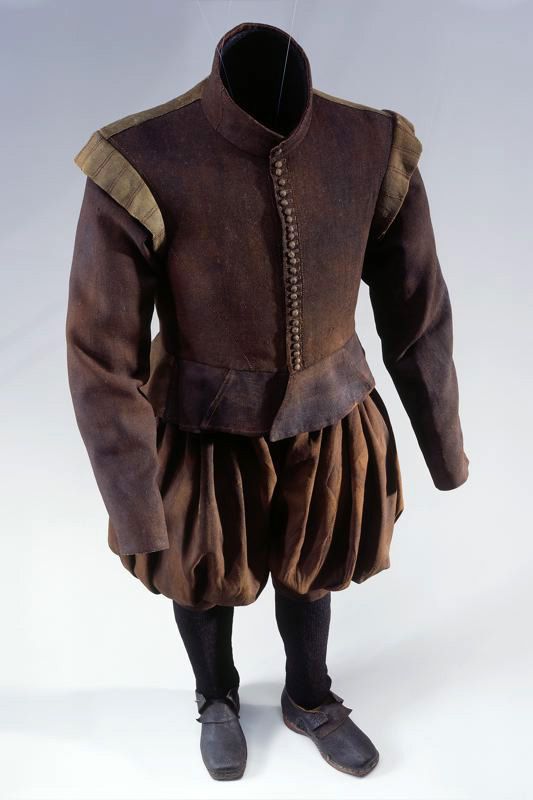

Giovanni Battista Moroni Clothes of Junkers Jerkin, Metropolitan New
The Tailor, c 1570 Von Bodegg dated York. 1580.
1600-1610
This class is to give you the basic pattern, the fitting and the instruction on how to make your doublet.
Above are some examples of doublets.
There are different things you can do with it, so think about:
-fastenings
-sleeves or no sleeves (a Jerkin)
-wings or no wings
-what type of tabs you wish to put around the waist line
Have a look at different resources and decide which your like best and then proceed.
Note: someone said to the me the other day that she wished that only with patterns and instructions that she be talked to as if she was incompetent…as she needed simple step by step instructions with the fancy words explained or otherwise she got lost easily.
These instructions are by no means meant to cause insult, or to teach the more experienced how to ‘suck eggs’. They are meant merely as the most simple and easy way for a beginner to understand the construction and to then create something they can be proud of.
The instructions below will show you how to make a doublet with sleeves, wings, collar and tabs around the waist….once you have made that – you can them embellish next time if you wish.
What you will be cutting out:
Note: Interlinings give stability and structure. For those of you that live in hot climates, it is of course up to you how you construct your clothing for comfort and heat however, I would always suggest interlining, especially for flimsy materials.
If you choose to use hook and eye tape the interlining is important as that is what the tape will attach to.
two sets of sleeves
two sets of sleeve linings
two sets of sleeve interlinings (depending on preference/materials chosen)
one right and left front of doublet
one right and left front of doublet lining
one right and left (or more) of front interlining (depending on preference/materials chosen)
one right and left back of doublet
one right and left back of doublet lining
one right and left (or more) of back interlining (depending on preference/materials chosen)
two wings
collar
tabs
arm binding
waist seam binding
Materials:
NOTE: It is up to you to decide the look of your doublet and how it is fastened, below is a list of possibilities:
hooks and eyes / hook and eye tape
– Hook and eye tape can be purchased from chain stores in New Zealand like Spotlight (metal at $20 a metre) or emporiums (white and black) for around $2 a metre….they are a quick alternative to hand-sewing hooks and eyes onto the doublet and it all depends on your time and level of authenticity you are aiming for. If you want a more ‘authentic’ looking hook and eye tape the metal is best – it is more expensive but the right choice for this, and I personally would recommend saving up and getting it – as you will only need half a metre (if that).
buttons – metal or thread covered.
– There were metal buttons in period – some were plain, others were made to look like the thread covered ones. Thread covered buttons can be hand made and there are instructions on the internet and you tube sites.
https://www.youtube.com/watch?v=jcYc7IMiRrg
thread
chalk/soap
the remnants of a bar of shower soap are very effective for drawing on material – it also washes/rubs off easily
pins
scissors
sewing machine / needles (hand sewing)
Fabrics to consider:
Outer Doublet – Wool, velvet, silk, (silk will require careful attention and lots of pinning so it doesn’t move around and warp when your sewing), other period materials
Lining of Doublet – silk, linen, wool
Interlining Layer – linen, wool
Note:
Man made fibres like polyesters are not a good choice if you want something that will breathe well in heat. Natural fibres also do not melt into your skin when exposed to fire.
If you are relatively new to sewing, I would suggest choosing a fairly stiff and non-slippery material (like velvet and silk) to sew with first time. It will make the whole process easier.
Construction:
Step one:
Wash your material. This may seem like a hassle at first, but linen and wool shrink, and colours can run.
Step two (Laying down the material):
place doublet pattern on material.
If you using scraps/odd sized pieces, you may want to cut out of calico the full doublet (back, two fronts, two sets of arms, two wings, collar and tabs) so you can place them down to get the best use of your fabric.
Note:
be aware of your grain*. If your material has a pattern or is velvet*, then the pattern pieces need to all go the same way on your material
*grain – essentially the lines in the material (if visible) that are the warp and the weft. cutting something straight on the grain means the warp or weft needs to be running the same way as the arrow on the pattern piece. If your unsure where the grain is, line the arrow up with selvage (the edge of the material) or if there is no selvage – pull the material from both sides, if it stretches a lot as if it is made from Lycra then it is the bias – don’t cut on this, turn it around to where it doesn’t stretch – or in the case of some wools, stretches less than the bias.
*velvet – has a pile, which affects the way it looks depending on which way it is cut. It’s important to be consistent and cut all of the pieces with the nap running in the same direction or it will look like it is different shades from different angles. While it is period to ‘piece’ certain garments, and to use both directions of the velvet in one outfit, if you want your doublet to be consistent – cut it all the same way. Hold the velvet up in front of a mirror or friend and see which way you prefer, turn the velvet piece around with the good side out, one way will look darker, the other lighter.
Step three (pinning and cutting):
If you prefer to pin, pin as many of the pattern pieces that you can cut out comfortably at one time to the material, or if you prefer chalk/soap draw around the pattern pieces as accurately as possible.
Drawing may be easier as patterns can move as you cut.
Now cut using sharp sewing scissors.
Step four (doublet construction):
pin and sew the back seam of the doublet
pin and sew the shoulders of the back doublet piece to the front doublet pieces
pin and sew the back side seam of the doublet to the two side front seams
PRESS YOUR SEAMS*
*pressing your seams is really important…it sometimes is the difference between a professional looking garment and not. The Chinese had irons over a thousand years ago…and medieval people had forms of ironing too – so don’t feel like it isn’t period to iron!
Note:
If your outer layer is really thin silk, you may want to back it with an interlining – use the method explained in step five to do this.
Step five (doublet lining and interlining – pinning):
Lay the doublet lining (front and back) and the corresponding interlining layer(s) down on top of each other
Pin the backs together carefully, creating a sandwich effect: interlining, lining, lining and interlining placing your pins with the head away from the edge and the points facing the edge of the material.* Pinning this way will mean that you can sew over your pins without having to take them out as you go – keeping your materials in place. For really slippery material or if you don’t want to sew over the pins, baste* together.
*Pinning flat is very important as the material can move while sewing and it may end up puffing or twisting once sewn together if not completely flat when sewing
*Basting stitches are long removable straight stitches, they hold the material in place and can be removed later once the garment is sewn. Hand sewing these stitches are recommended.
Sew shoulder seams together in the same way
Sew the side back and side front together in the same way
Now you have two full doublet pieces: the lining and the outside.
Step six (pinning the doublet and doublet lining):
put your doublet lining into your doublet wrong sides* together
Lay it flat if you need to, or put it onto a dummy if you have one.
Pin the centre back seams together as matched as you can get them, making sure the neck outer and lining matches up at the top.
Pin the side back seams together as matched as you can get them.
Pin around the arm sky (arm hole) as matched as you can get them.
Pin the necks together
*wrong sides are the insides – the raw seams (hopefully the bits you will never see)
Note: you may want to pin the way that was suggested in step five, so that you can sew over the pins, you may want to baste if the material is hard to sew or to prevent it slipping as you sew.
Step seven (sewing the doublet and lining arm holes together):
Sew doublet and doublet lining together around the armhole seams (baste first if you need to)
Leave these raw*
clip the edges*
*Raw refers to leaving the edges of the fabric un-hemmed, unfinished – just as they are.
*clip the edges means make a small cut once every inch or so – so that the material fibres are cut and therefore allow the fabric to move and bend where they would have been restricted previously
Step eight:
If using hook and eye tape:
laying the doublet down flat, fold back the outside centre front layer of the doublet and doublet centre front lining underneath, leaving the interlining showing. At this point, you will want to trim or fold back (with an iron) the edge of the interlining so that the hook and eye tape is about an inch away from the the edge of the outside layer and lining of the doublet .
Pin the hook and tape evenly to the interlining on both sides so the hooks and eyes will match up when closed. Cut the tape off to the require length
sew this on carefully as the metal may snap your needle on your machine if you get too close
Step nine (wings):
NOTE:
if you wish to embellish your wings you can do a number of things like slashing them to expose a different material underneath.
For this, you will need another piece of material sewn to the wing to show through, and to pre-slash the material before it is sewn.Stamping, sewing finger loop braid /lace etc. on – it all depends on your research and what you wish to create.
Basic wing construction without embellishments:
Fold the wing in half length ways (the longest way)
Pin the wing onto the armhole right sides together*
Sew the wing onto the armhole leaving the edges raw
*right sides together means the good sides or outside layer of the garment.
Step ten (pin and sew sleeves – outside layer):
NOTE: It is very easy to end up with two sets of left or right sleeves if your material is the same on both sides. Make sure when you start on your second arm, that your sewing the opposite of what you just sewed. Hold them up to each other just to be sure.
Pin right side of sleeves to each other
Sew sleeve seams
Press seams
Note: You can use a special ironing board arm specially designed for pressing trouser legs and sleeves, or use a cardboard tube to get the same effect while pressing. This is easier than pressing flat on an ironing board.
Step eleven (pin and sew sleeve lining)
NOTE – just like the sleeves you can end up with two rights/lefts – hold them up and make sure they are pinned as opposites
Pin sleeve linings to each other and sew
Sew sleeve linings
Press seams
Step Twelve (putting sleeves into armhole):
Take Right sleeve and sleeve lining, with your sleeve the right way and your lining the wrong way out slip the sleeve lining into the sleeve. This should mean that the sleeve heads (tops of the sleeves match/ are in the same place) but the seams/raw edges are on the inside of the two pieces unable to be seen.
sew these together at the sleeve head so that they are only open at the wrist (this will be hand sewn later with a blind hemming stitch)
Step Thirteen (Attaching sleeve to armhole):
With the sleeve the right way out, and the doublet the wrong way out slip the sleeve into the correct hole (right sleeve, right arm hole etc)
Take the sleeve head and match the mark on it matching the very top of the sleeve to the shoulder seam.
Pin this.
Now pin the rest of the sleeve into the hole – easing* it in if needed.
Baste if you need to.
*easing is a term used to describe manipulating your material within a certain space. To ease the sleeve into the sleeve hole may mean slightly strectching it between pinning or making it slightly tighter in areas, it should never gather or bunch/over stretch however, if it does – you may need to resize the sleevehead.
Step Fourteen (sewing in the sleeve head to the armhole)
Once the sleevehead is in place sew it in – depending on the materials you may need to do this by hand with a small back-stitch (for strength)
clip the edges
leave the edges raw
Note:
at this stage you should be left with a doublet that has sleeves, wings, and a body that is open at the waist (bottom seam), centre front (where it would close) and neck.
Step fifteen (sewing /closing the front):
With hook and eye tape:
If you are working with hook and eye tape ease the hooks open slightly with a blunt knife. Open just enough so that the lining material will go underneath them at the moment.
Hem – ie fold the doublet material and the lining material back towards the inside to where the hooks and eyes finish.
Pin this.
Hand sew the doublet and the doublet lining around the hooks and eyes with a very small blind hemming stitch / teddy bear stitch / ladder stitch / wedding dress stitch (all are the same thing to different people)
Close the hooks to where they were originally with the same blunt knife so that they still work.
Note:
make sure that when you are sewing down the front of both sides that you don’t cover up either the hook or the eyes as you go, they need to still be functional and visable to work!
Step sixteen (sewing /closing the front):
Closing the front – not with hook and eye tape:
Hem – ie fold the doublet material and the lining material back towards the inside about an inch.
Pin.
Hand sew down the front using a very small blind hemming stitch / teddy bear stitch / ladder stitch / wedding dress stitch (all are the same thing).
Step seventeen (tabs):
Take your tab pattern pieces and pin and sew the good sides together
Clip the corners* and cut a v shape from the corners (so that there isn’t a bunching of material at that spot when turned inside out)
press the edges
turn them right side out and press again
*clip the corners means cutting the diagonal corner off the material to make it easier to push the edge out when turned right way out.
Step eighteen (attaching the tabs):
With the doublet back good side out laying flat, take the back tab and put the right side doublet and tabs together so that the tab edges and doublet edge are butted together.
Pin and if necessary baste
Sew
When you hold the doublet up, the back tab should flop down adding extra length to the doublet
Continue in the same way with the rest of the tabs – sew them so that they overlap and look like the painting you are basing your outfit on.
Step nineteen (sewing the collar):
Pin and sew the collar right sides together*
clip corners
Press seams
Turn right way out
press again
*make sure that the collar is still the same size as the neck opeing and that it matches as close as you can make it with seam allowence, if not cut to size and sew
Step twenty (attaching the collar):
Pin the doublet neckline together wrong sides together (there should be no way to turn it by now)
Sew the doublet neckline together by hand with running stitch or by machine.
Pin the collar onto the doublet right sides together
Sew
Clip the edges
Fold the hem up on the inside of the collar and hand sew using invisible stitch to the the inside of the doublet, closing the hole completely.
Step twenty-one (cuffs finishing):
Note:Well done! you should have an almost complete doublet. Only the cuffs, armhold binding and waist binding should be left to do
Put the doublet on the person which it is intended for.
Hem/fold the cuffs back to where tey should be, so that no raw edges show with good side and lining matching up.
Invisible stich them in place
Press the seam
Step twenty-two (arm hole binding):
Take the two strips of material that are for your armhole binding
They should not be bias cut as there is more evidence for straight cut this at this stage
Iron a crease down the middle length ways
Iron half an inch on one side back so there is a hem
Iron half and inch on the other side back so there is a hem
Pin this to the arm hole on the doublet and invisible stitch it on, on both sides, as a binding.
Join it at the join.
Step twenty-three (waist binding)
Cut this to the length of the waist on the doublet
Iron a crease down the middle length ways
Iron an inch on one side back so there is a hem
Iron an inch in pn the other side so there is a hem
Invisible stitch using very small stitches onto the waist to cover the seam like a binding
Now you are ready to make the bottom garment that you will wear the doublet with, it most likely will be something that ties onto the doublet. Until this is made, wait to put the eyelettes on as you will need to match the two up.
Please note: If you wish to reproduce this in any way please credit me. We all work very hard and share our knowledge freely in the SCA. It would be a shame to find my work in someone elses name. Thank you.
whimsymum
March 17, 2017
I am excited to find this article! I’m dressing my 10-year-old as William Shakespeare for a history presentation next month, and though I sew… it’s not usually garments. I’ll be starting with a jerkin! Thanks for sharing!
Jasper
January 31, 2022
Hi! I very much appreciate the detailed construction instructions! They are very comprehensive.
I know it’s been some years since you wrote this, but do you have any guidance on where to find a 16th century doublet pattern? (Especially one that would be adaptable for a plus-sized female figure?)
Many thanks!